

In May 2018 I started to demolish an old open fronted dutch barn, that had finally given itself up to the North Wales weather after 50+ years. It had served us well for storing firewood, hay, straw & our vehicles since we moved here in 2011, but the time had finally come when part of the roof was torn off in a storm, and it time was to embark on my biggest project to date, building my dream workshop (with an attached garage & store room). It finished up as an 144m2 (approx. 1,550 sqft) space, 18m x 8m - the timings in this build are for general reference as it was not done on a full time basis, except the ground works & roofing where I dedicated a week each. I’d estimate I put in 30 long days (around 300 man hours) between July-November (not including the demolition of the previous barn)

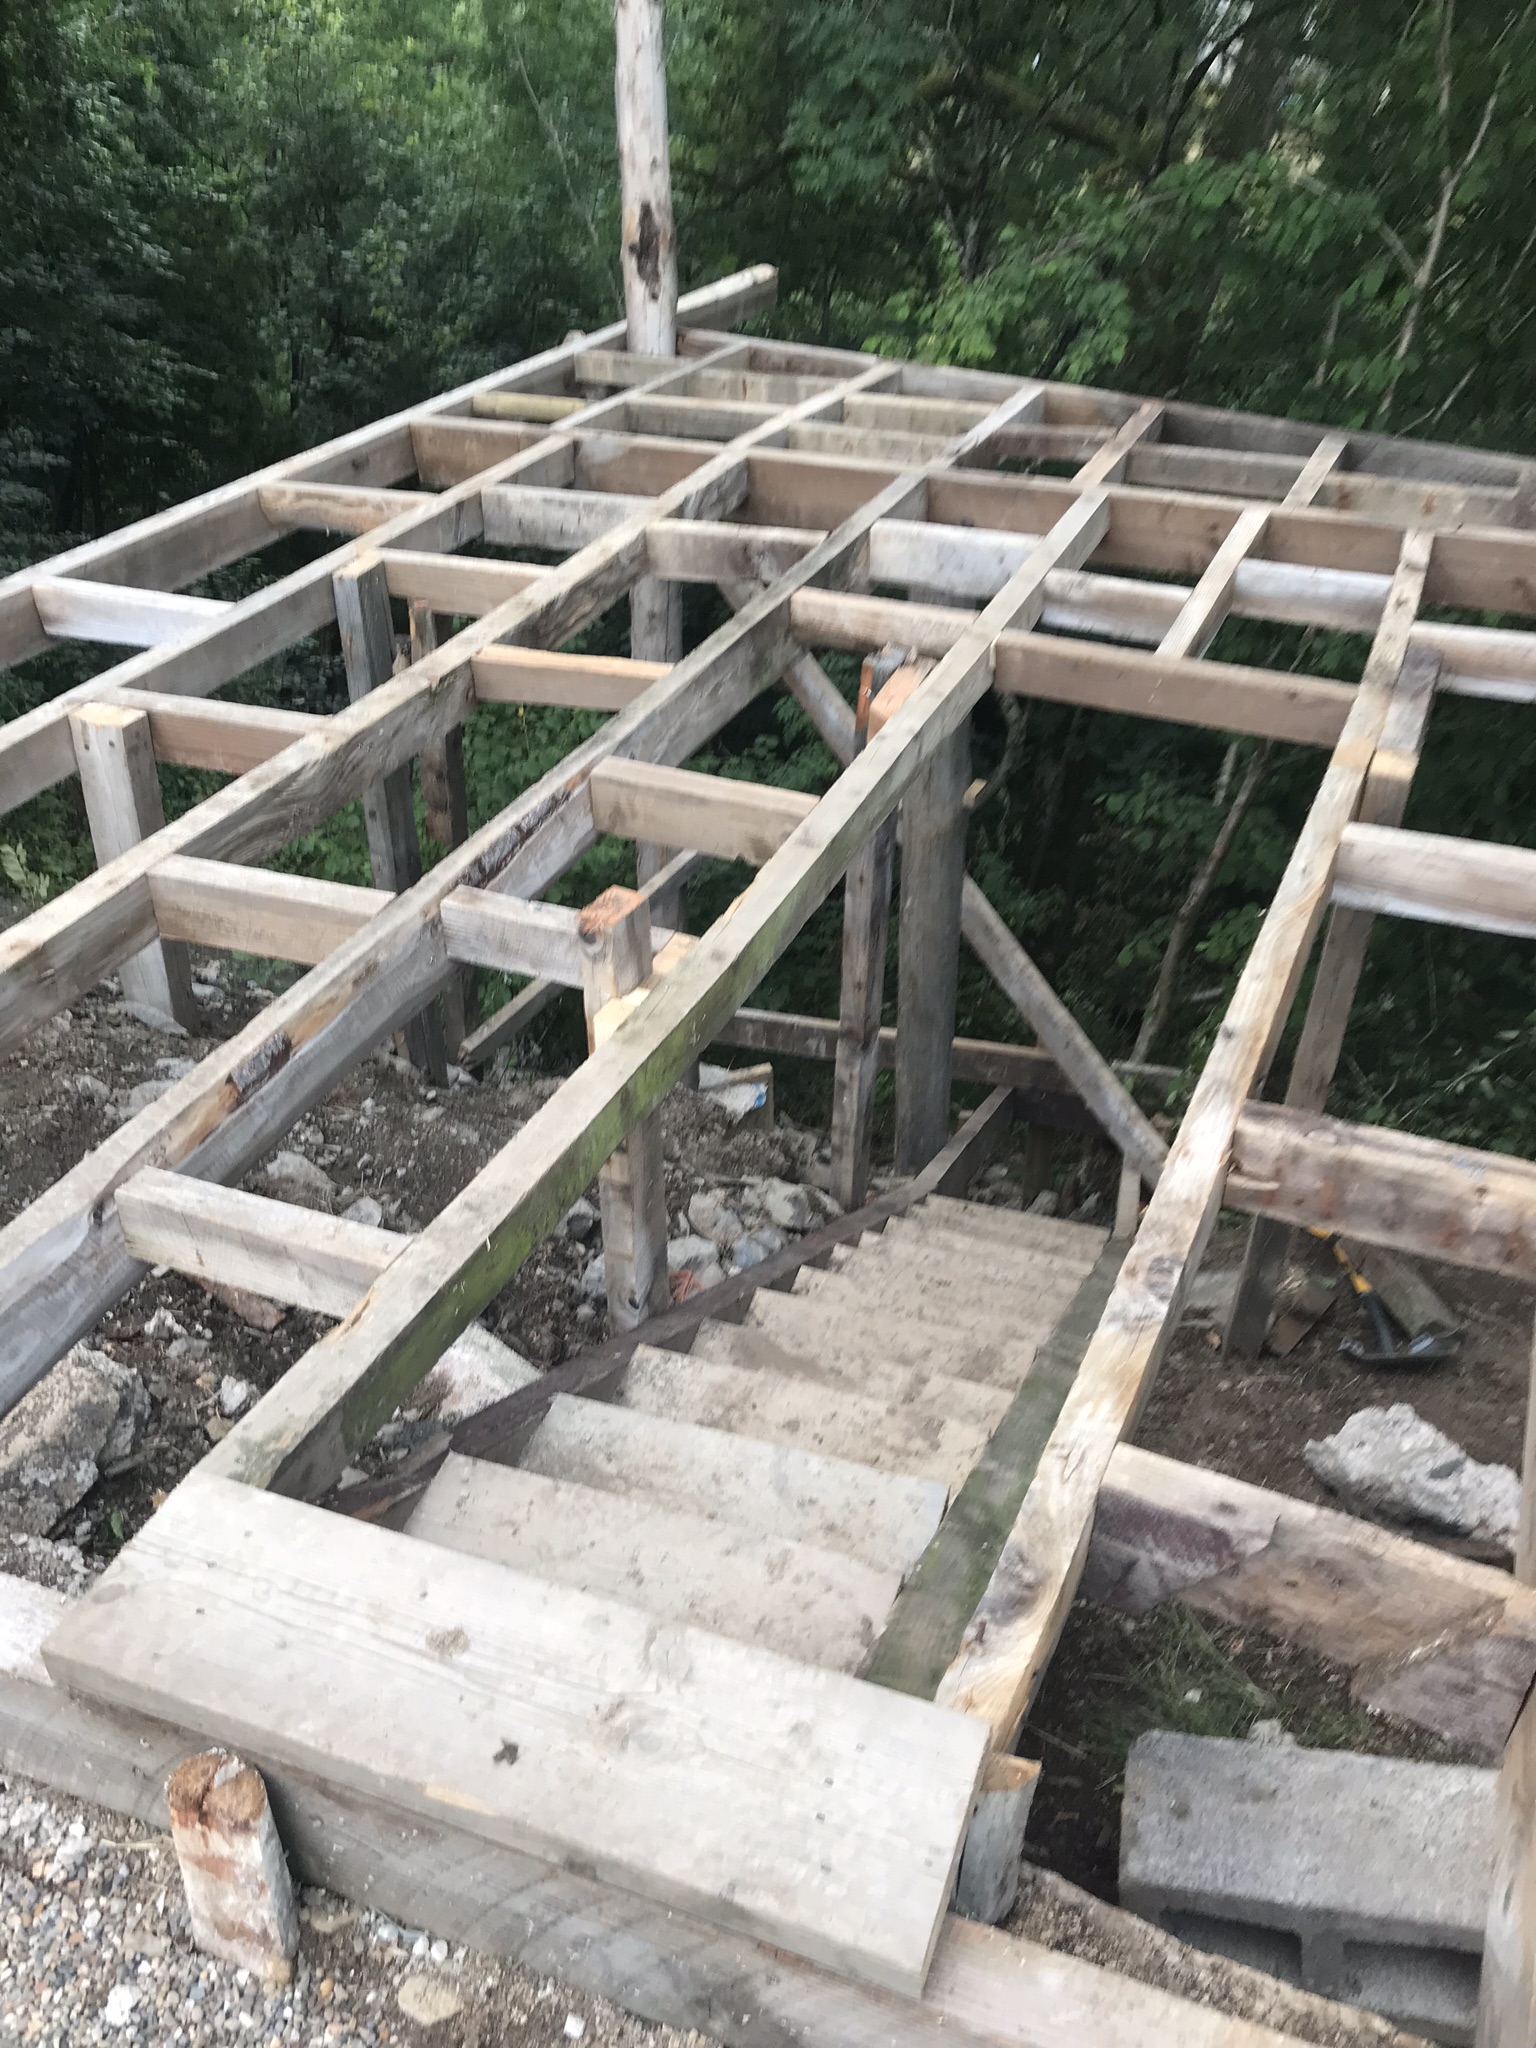
The demolition took one month as I wanted to reclaim as much of the pitch pine timbers (as you just can’t find them easily anymore) in the old barn so I could re-use it to build a deck on the slope down to the river, behind the new workshop - this will be become a social space to relax with friends & family in the future, so will be the source of many projects moving forwards
I started with removing the corrugated sheet metal cladding on the walls & roofing - I sold the best pieces to a local farmer & the most rusted panels were sold for scrap metal. The timbers were then pulled down (with the help of my chainsaw, ropes & trusty L200 pickup) & catalogued for the deck build - some pieces were set aside to dry for future projects
I then started to break up the previously unfinished concrete walls & foundation so we could get ready for the excavation & ground works - this is the only part of the build I had help with, but foundations are so important it’s key you get professional advice & support even if you want to be fully involved like I wanted to be
On July 17, my friend & local farmer Al (he has a construction background) turned up with his digger (and other key pieces of equipment) & we started the 1st of four 14-hour days, excavating, levelling, damp-proofing, drainage channelling, shuttering, laying rebar & culminating with the pour of 40m3 of concrete on July 23 using a 36m boom pump - it was so much fun! On the pour day we had 7 trucks, myself, Al, his brother Dyffd & friend Gitto as the crew, with the pump operator Wayne on the controls - it was a satisfying day to see a lot of hard work come to fruition. The next day Al & I mortared in the eco-drains at the front of the slab & then Al poured decorative slate chippings on the drive in front of the new site


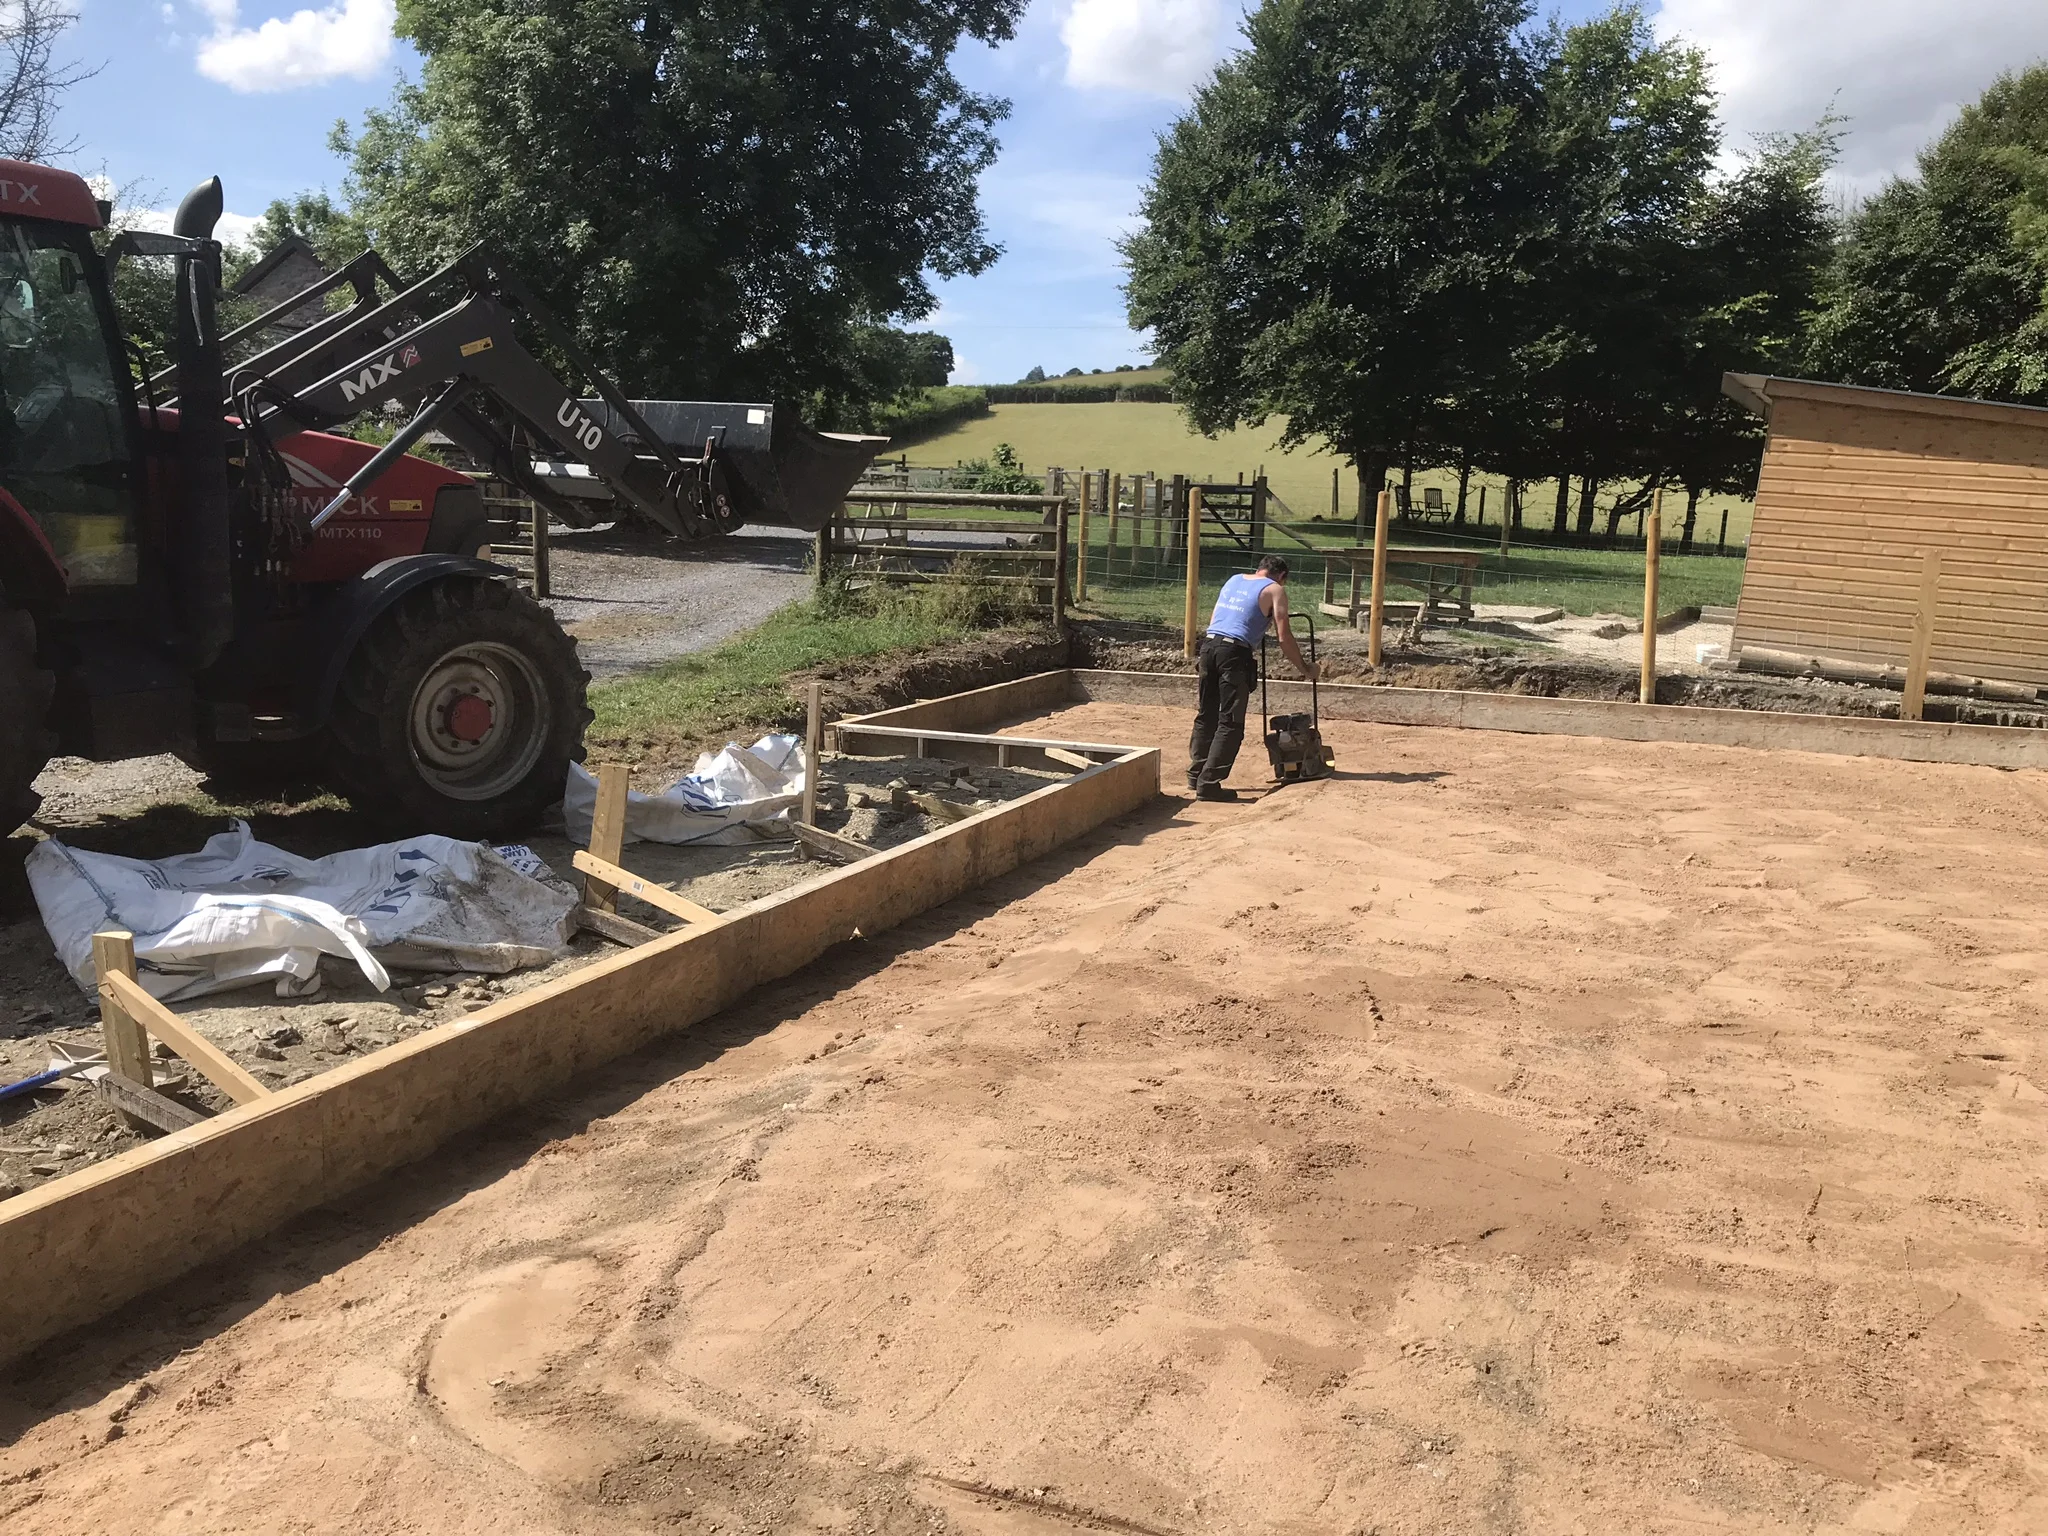


It was now time for my expertise to take the reins & begin the timber framing, but I decided it would be easier to construct the deck on the slope before beginning the building - this turned out to be an inspired idea as the “deck side” of the building would have been 10 times harder without a wide flat surface to work on! And when I say “slope”, it not far off being a “drop” down to the river…
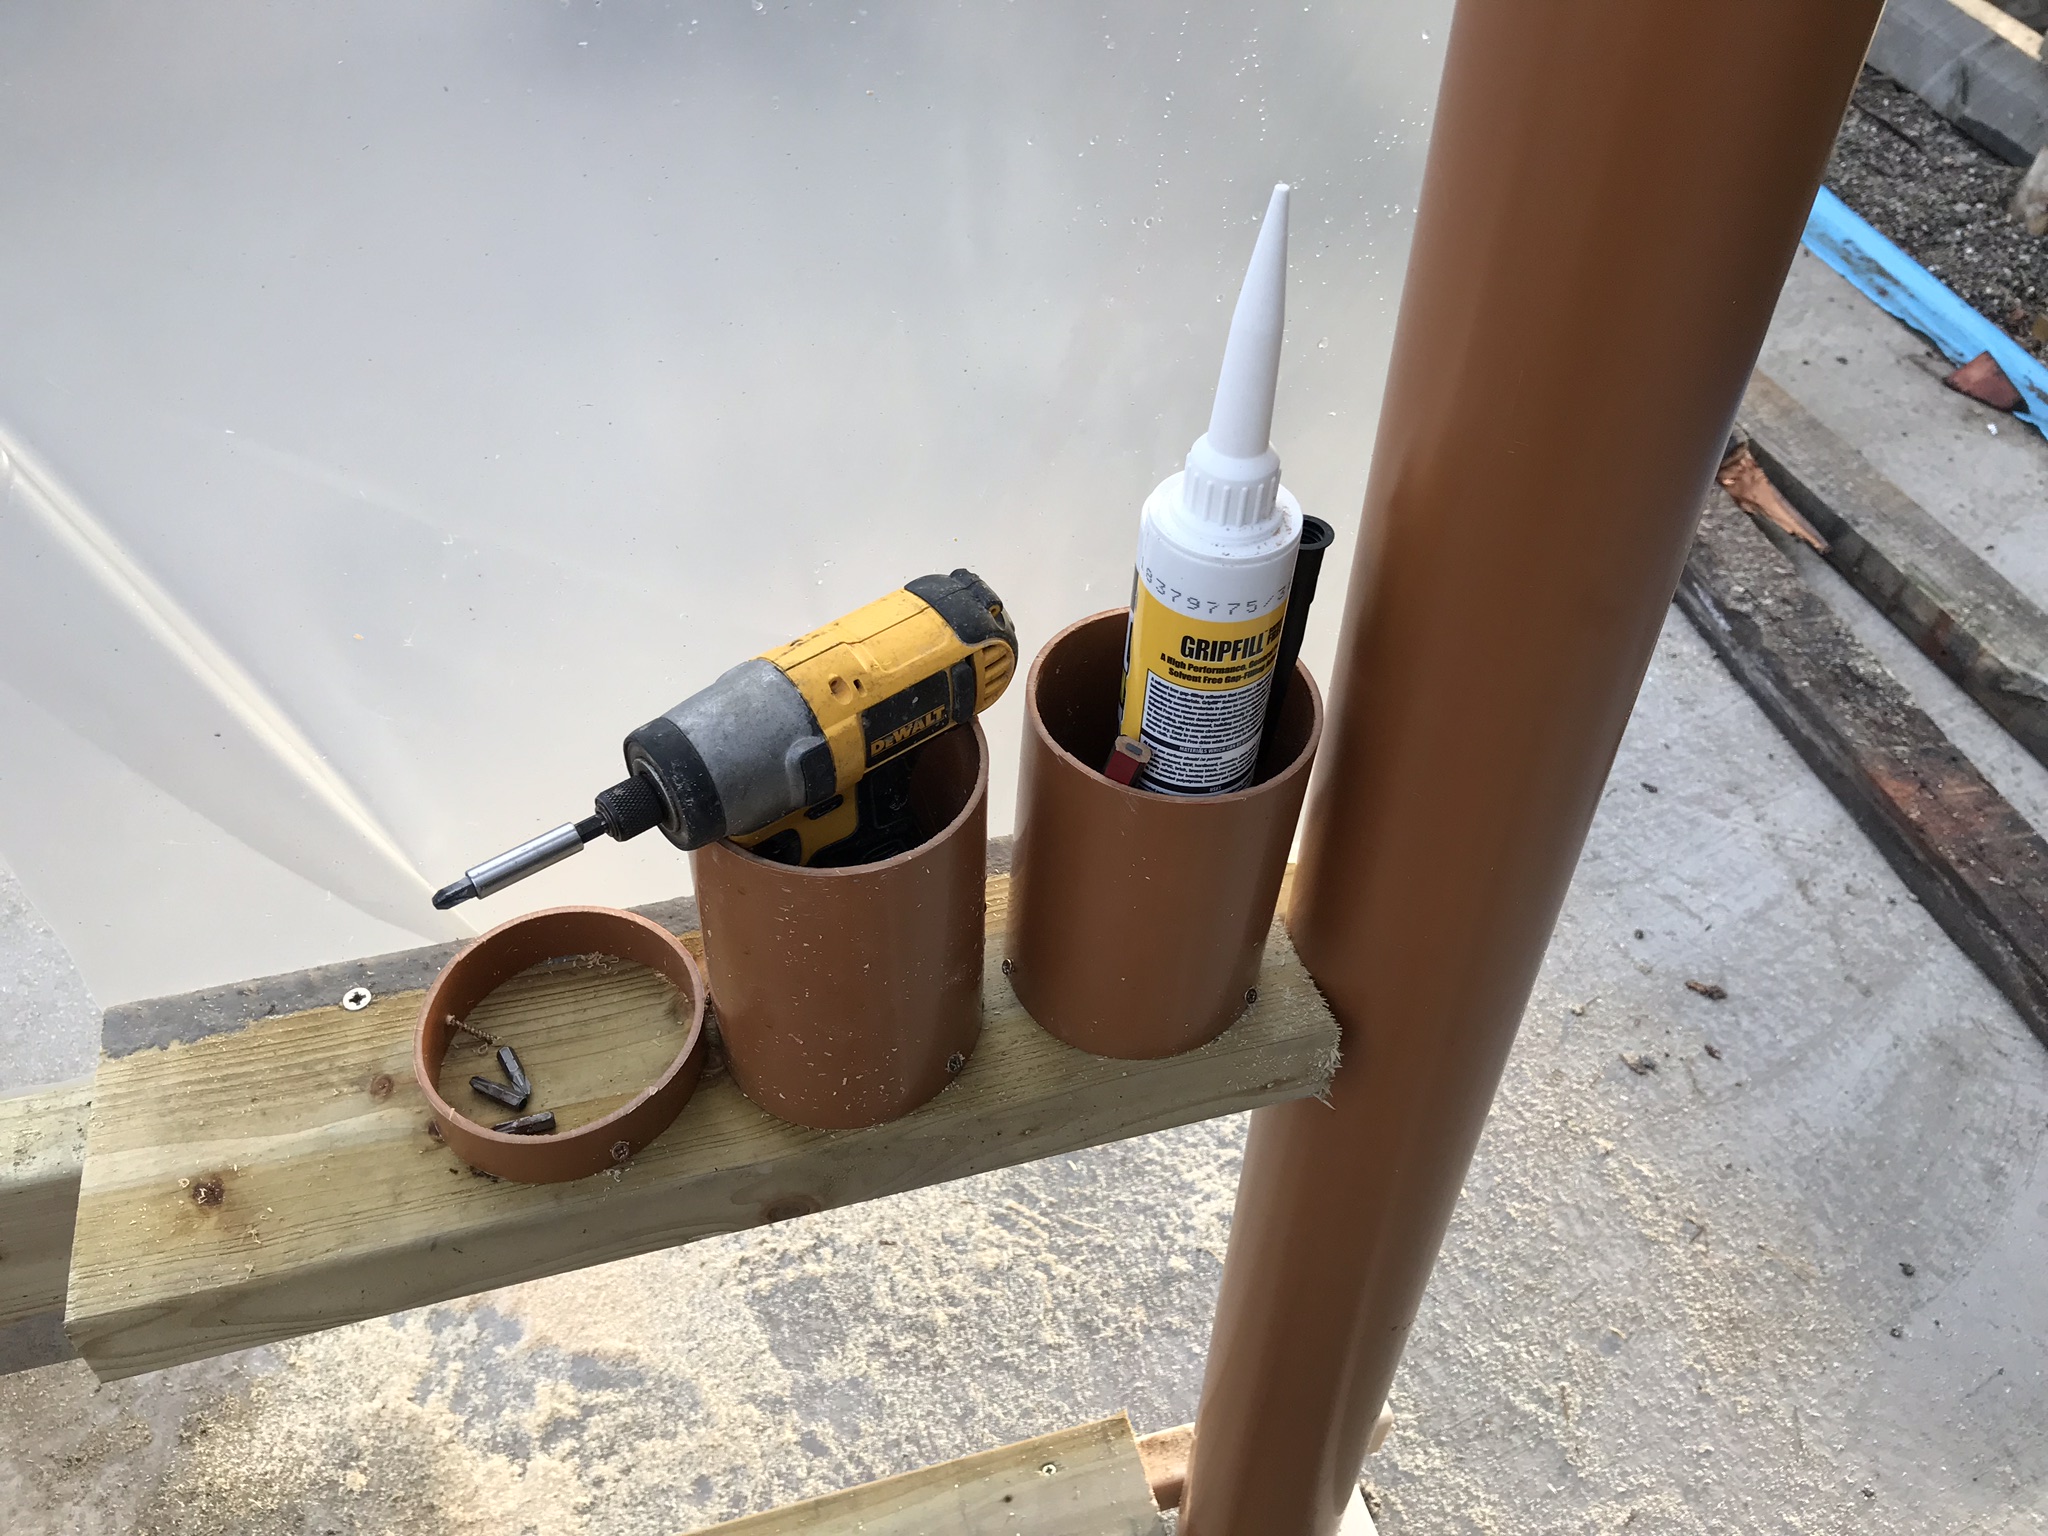
Before starting (end of July) the Welsh weather began to show it’s teeth after possibly the best/driest summer in my living memory, so I constructed a mobile work tent from left over drainage pipe, stock timber & clear sheeting - my Keter storage was mounted inside for my tools & I fitted very heavy duty casters so I had a mobile mini-workshop that my wife & I nicknamed D70 after finding an old vehicle license plate on the site of the old barn - with a workshop in place I started the deck
It took me 3 weeks, 3,000 140mm construction screws, 600+ cuts on my chop saw & more impact driver bits & drill bits than I care to remember…from my reclaimed timber in the original barn I had one 3m piece left…it was meant to be!


On August 11, I constructed a 16’ x 8’ framing jig to make each framing panel - this speeds up the process if you’re working alone & helps to ensure square & had markings for repeatable measurements like the 2ft centres for the studs…now a note of caution to this approach, unless you can dead lift 80kg of timber on your own I would suggest more traditional methods or smaller sections. Equally difficult is moving each section to its final place as you risk damaging or warping the frame by dragging it - to make moving each frame easier I made two trolleys with framing timber off-cuts & some heavy duty casters - worked great! I used 145mm (6”) C16 Treated Timber for the frames at a standard 2.4m (8ft) height - each stud of the frame had 2 or 3 cross-noggins (definitely 3 in the corners). During construction I reinforced each frame section with 2 braces, staked into the ground. On each corner I reinforced with a temporary top brace, using a 5ft length, with the outer corners set at 3ft & 4ft respectively (3,4,5 method for square!). All sections were laid on top of a Damp Proof Membrane (DPM) to protect the timber from rising damp from the slab (even though its treated timber & the slab has a DPM as well - better be safe & a 100m roll is less that £20!). After checking square & plumb throughout I then removed the top bracing and added another line of timber on the top, overlapping the joins of each frame section to improve rigidity. The last thing to complete framing is secure the frame to the concrete slab (or your stem wall if that’s what you’ve decided to do). I do this with 100mm x 10mm concrete bolts with hex heads from Dewalt. I recommend using a bolt in every other stud, and doubling up in the corners. These are installed by drilling a 10mm pilot hole into the concrete (through the timber & DPM) then drive the bolt home using an impact wrench on max setting

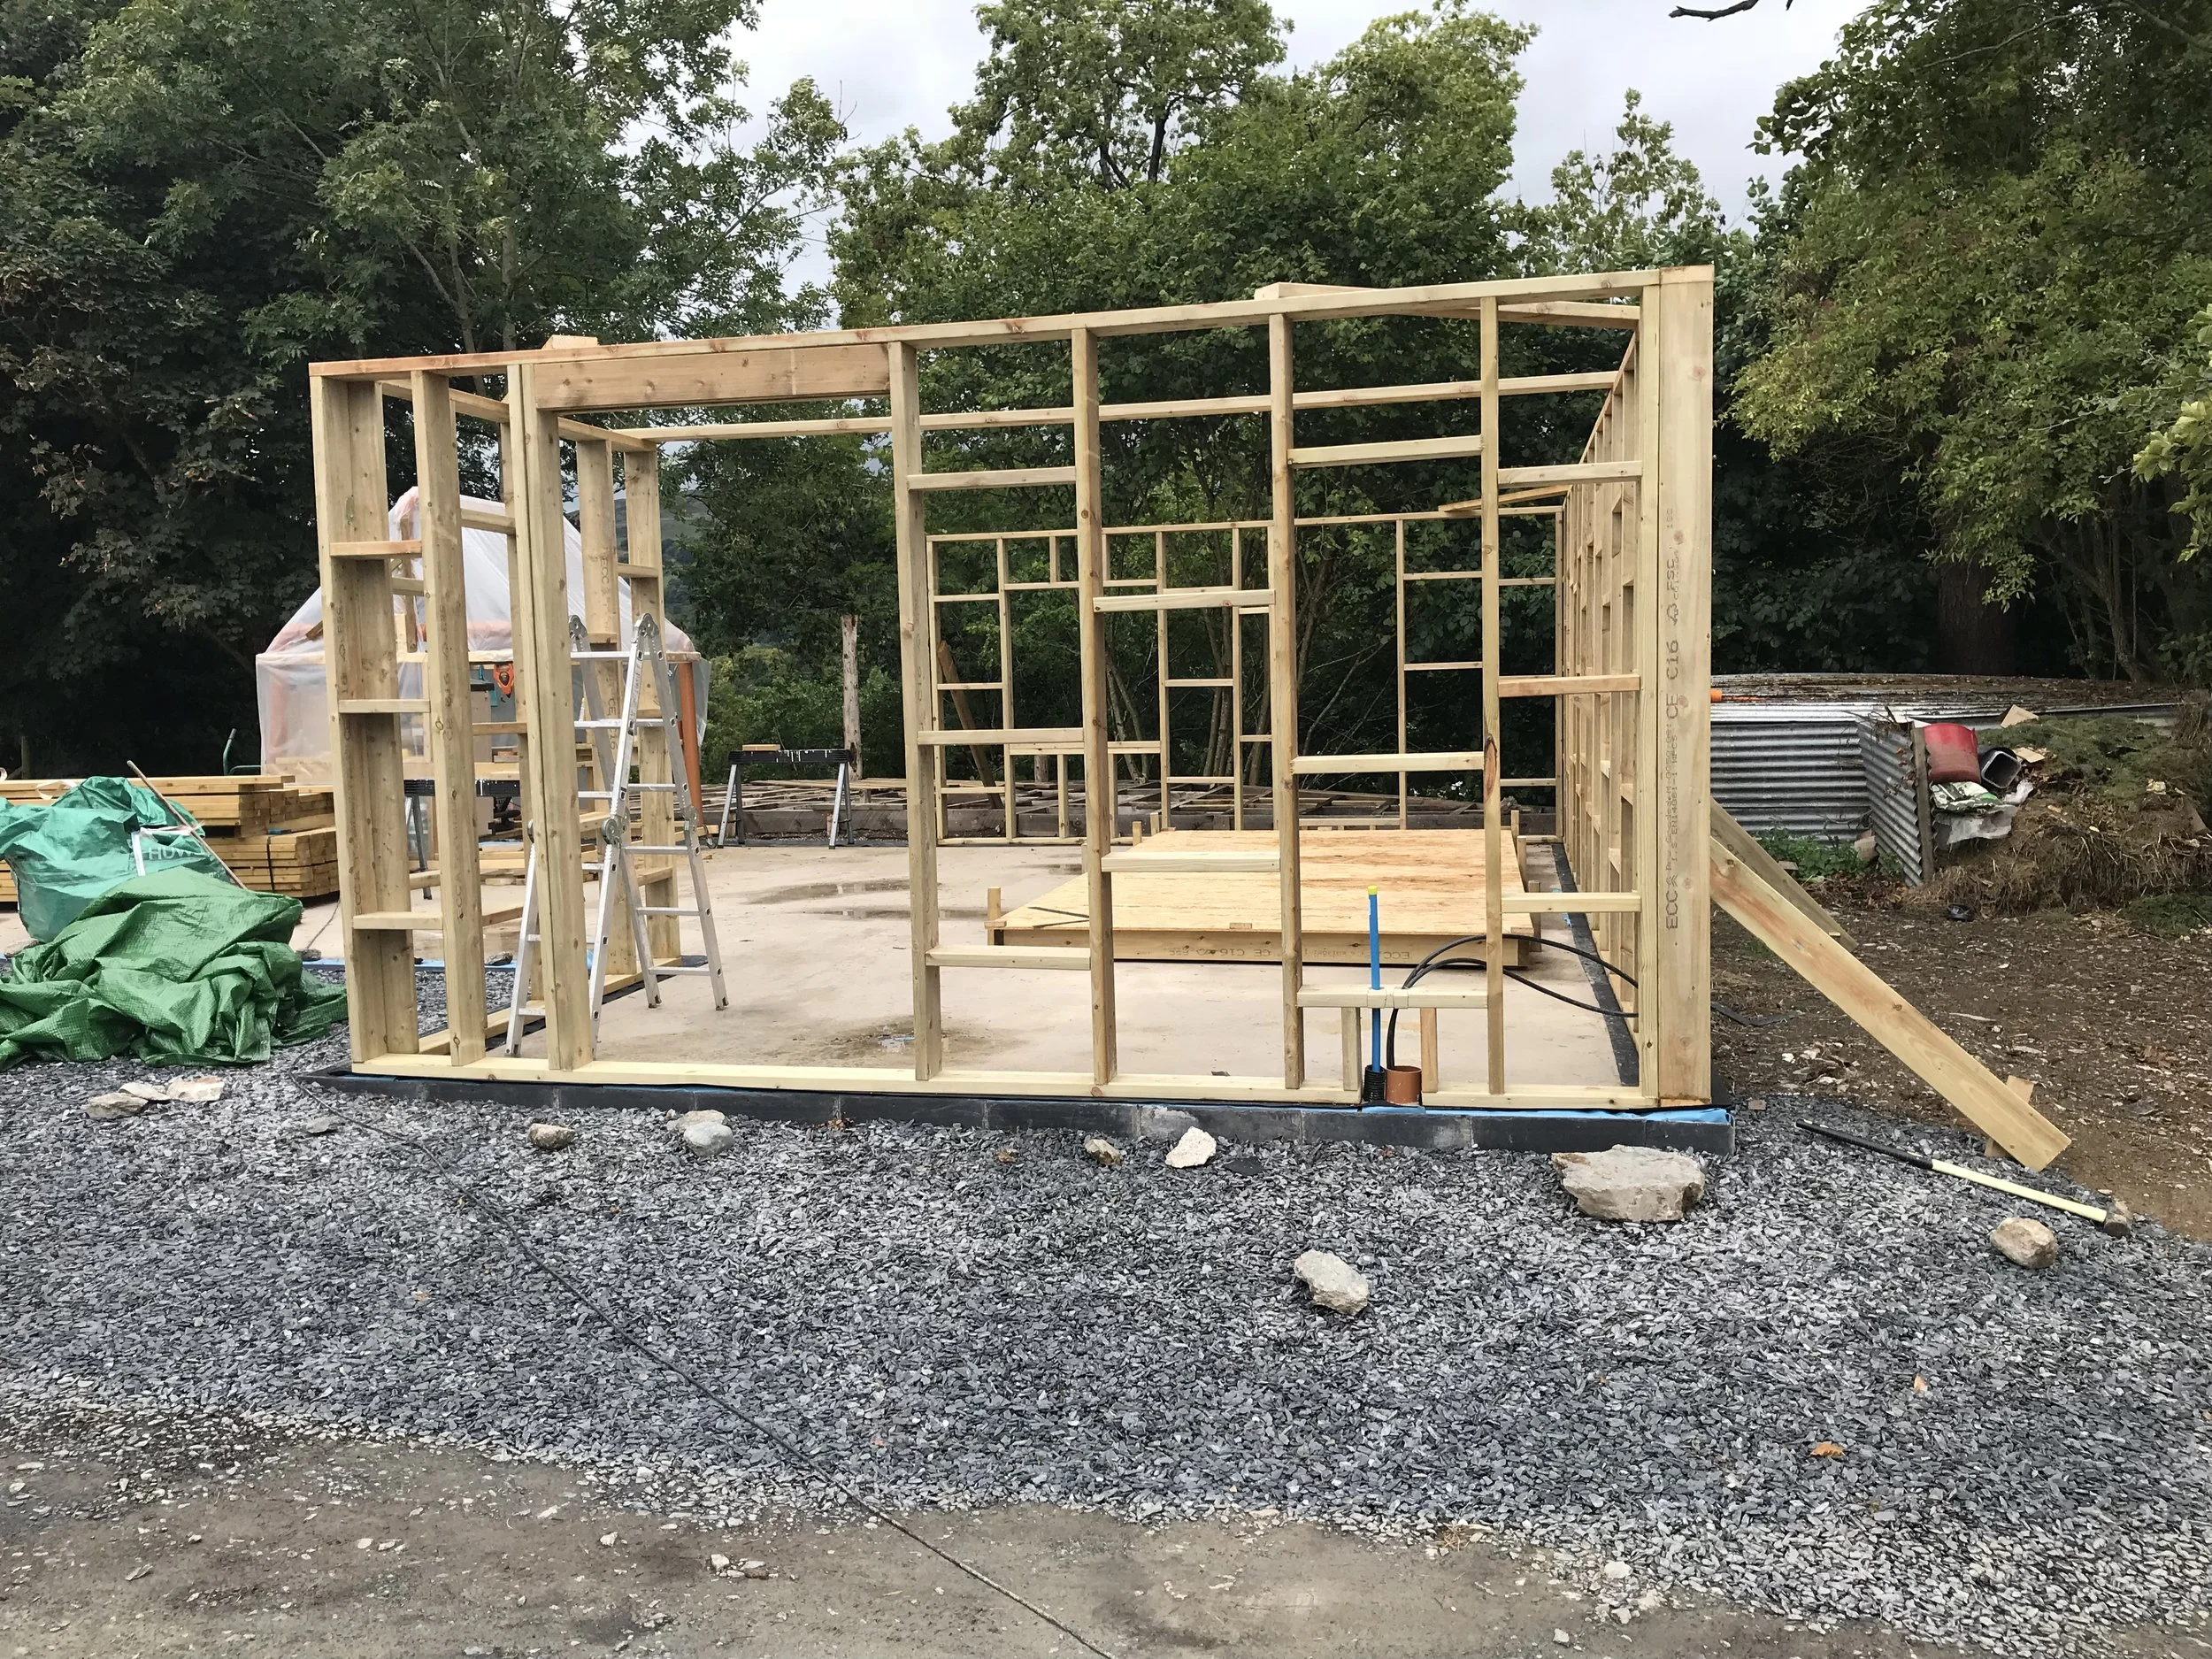


It was at this point I discovered Instagram & began documenting the build and doing stories for each major stage - check out my Instagram profile (click the logo above) & click on the “Workshop” highlights - I also have some tips videos on parts of this build there as well
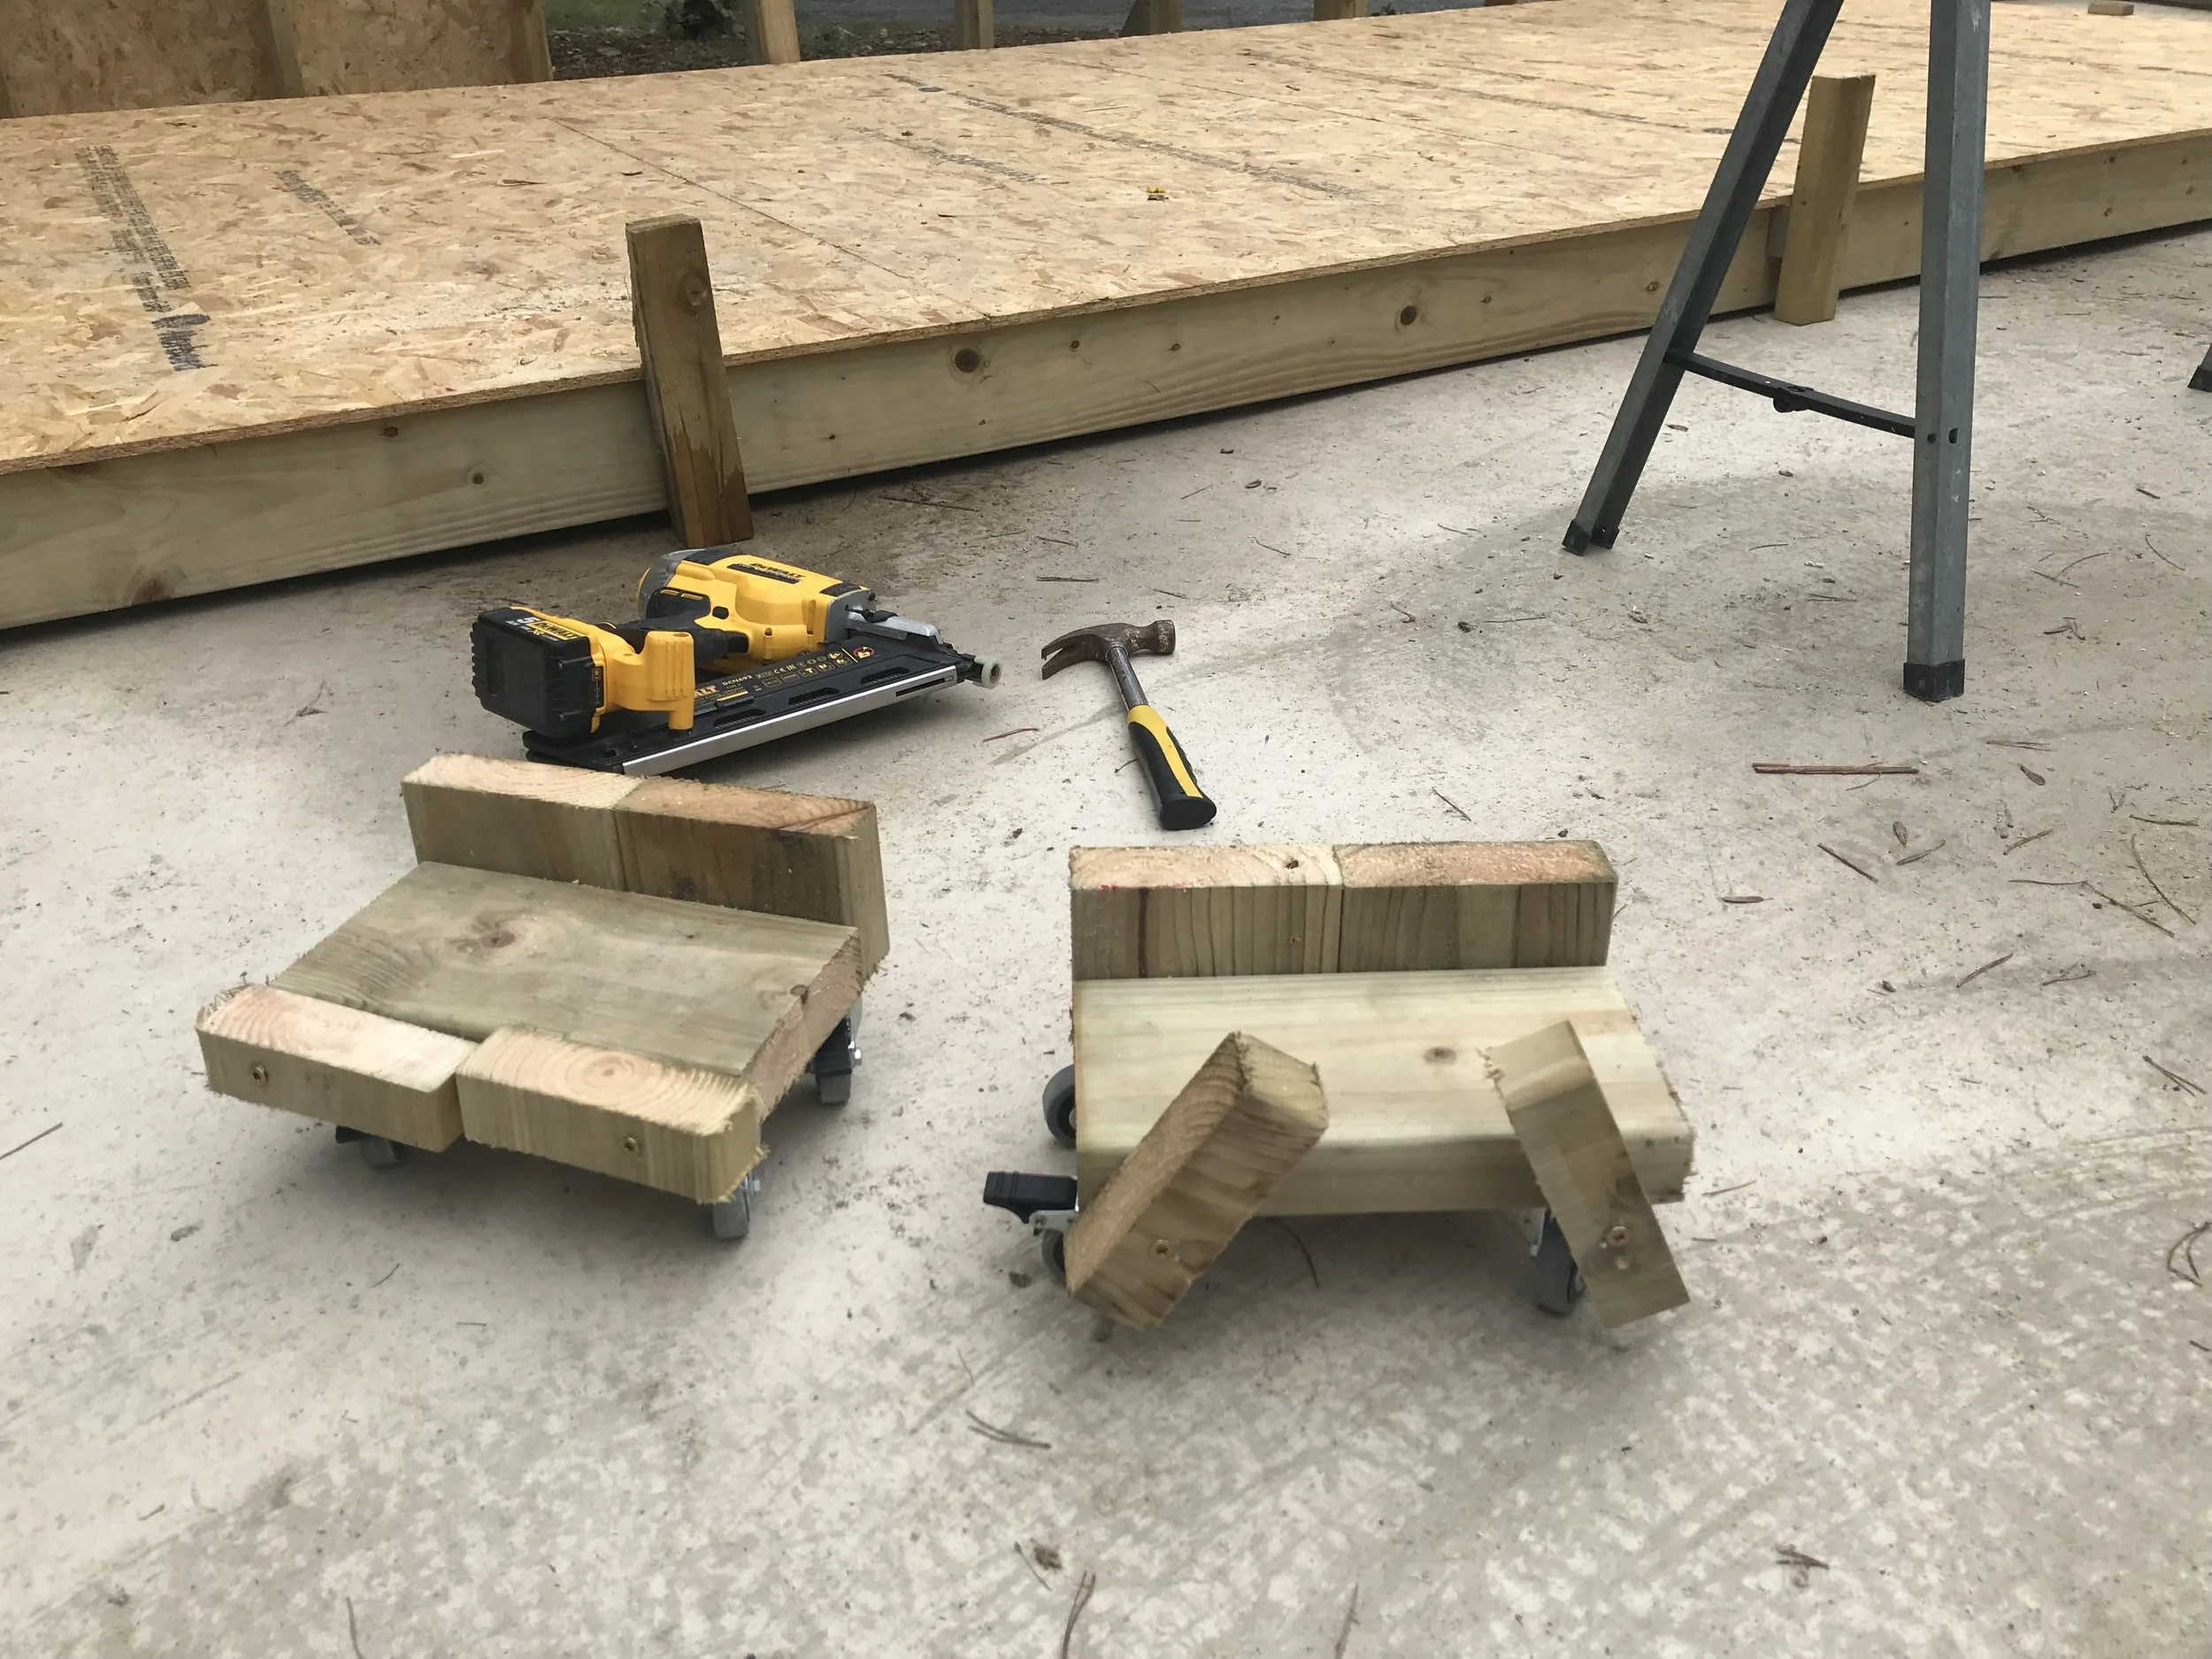
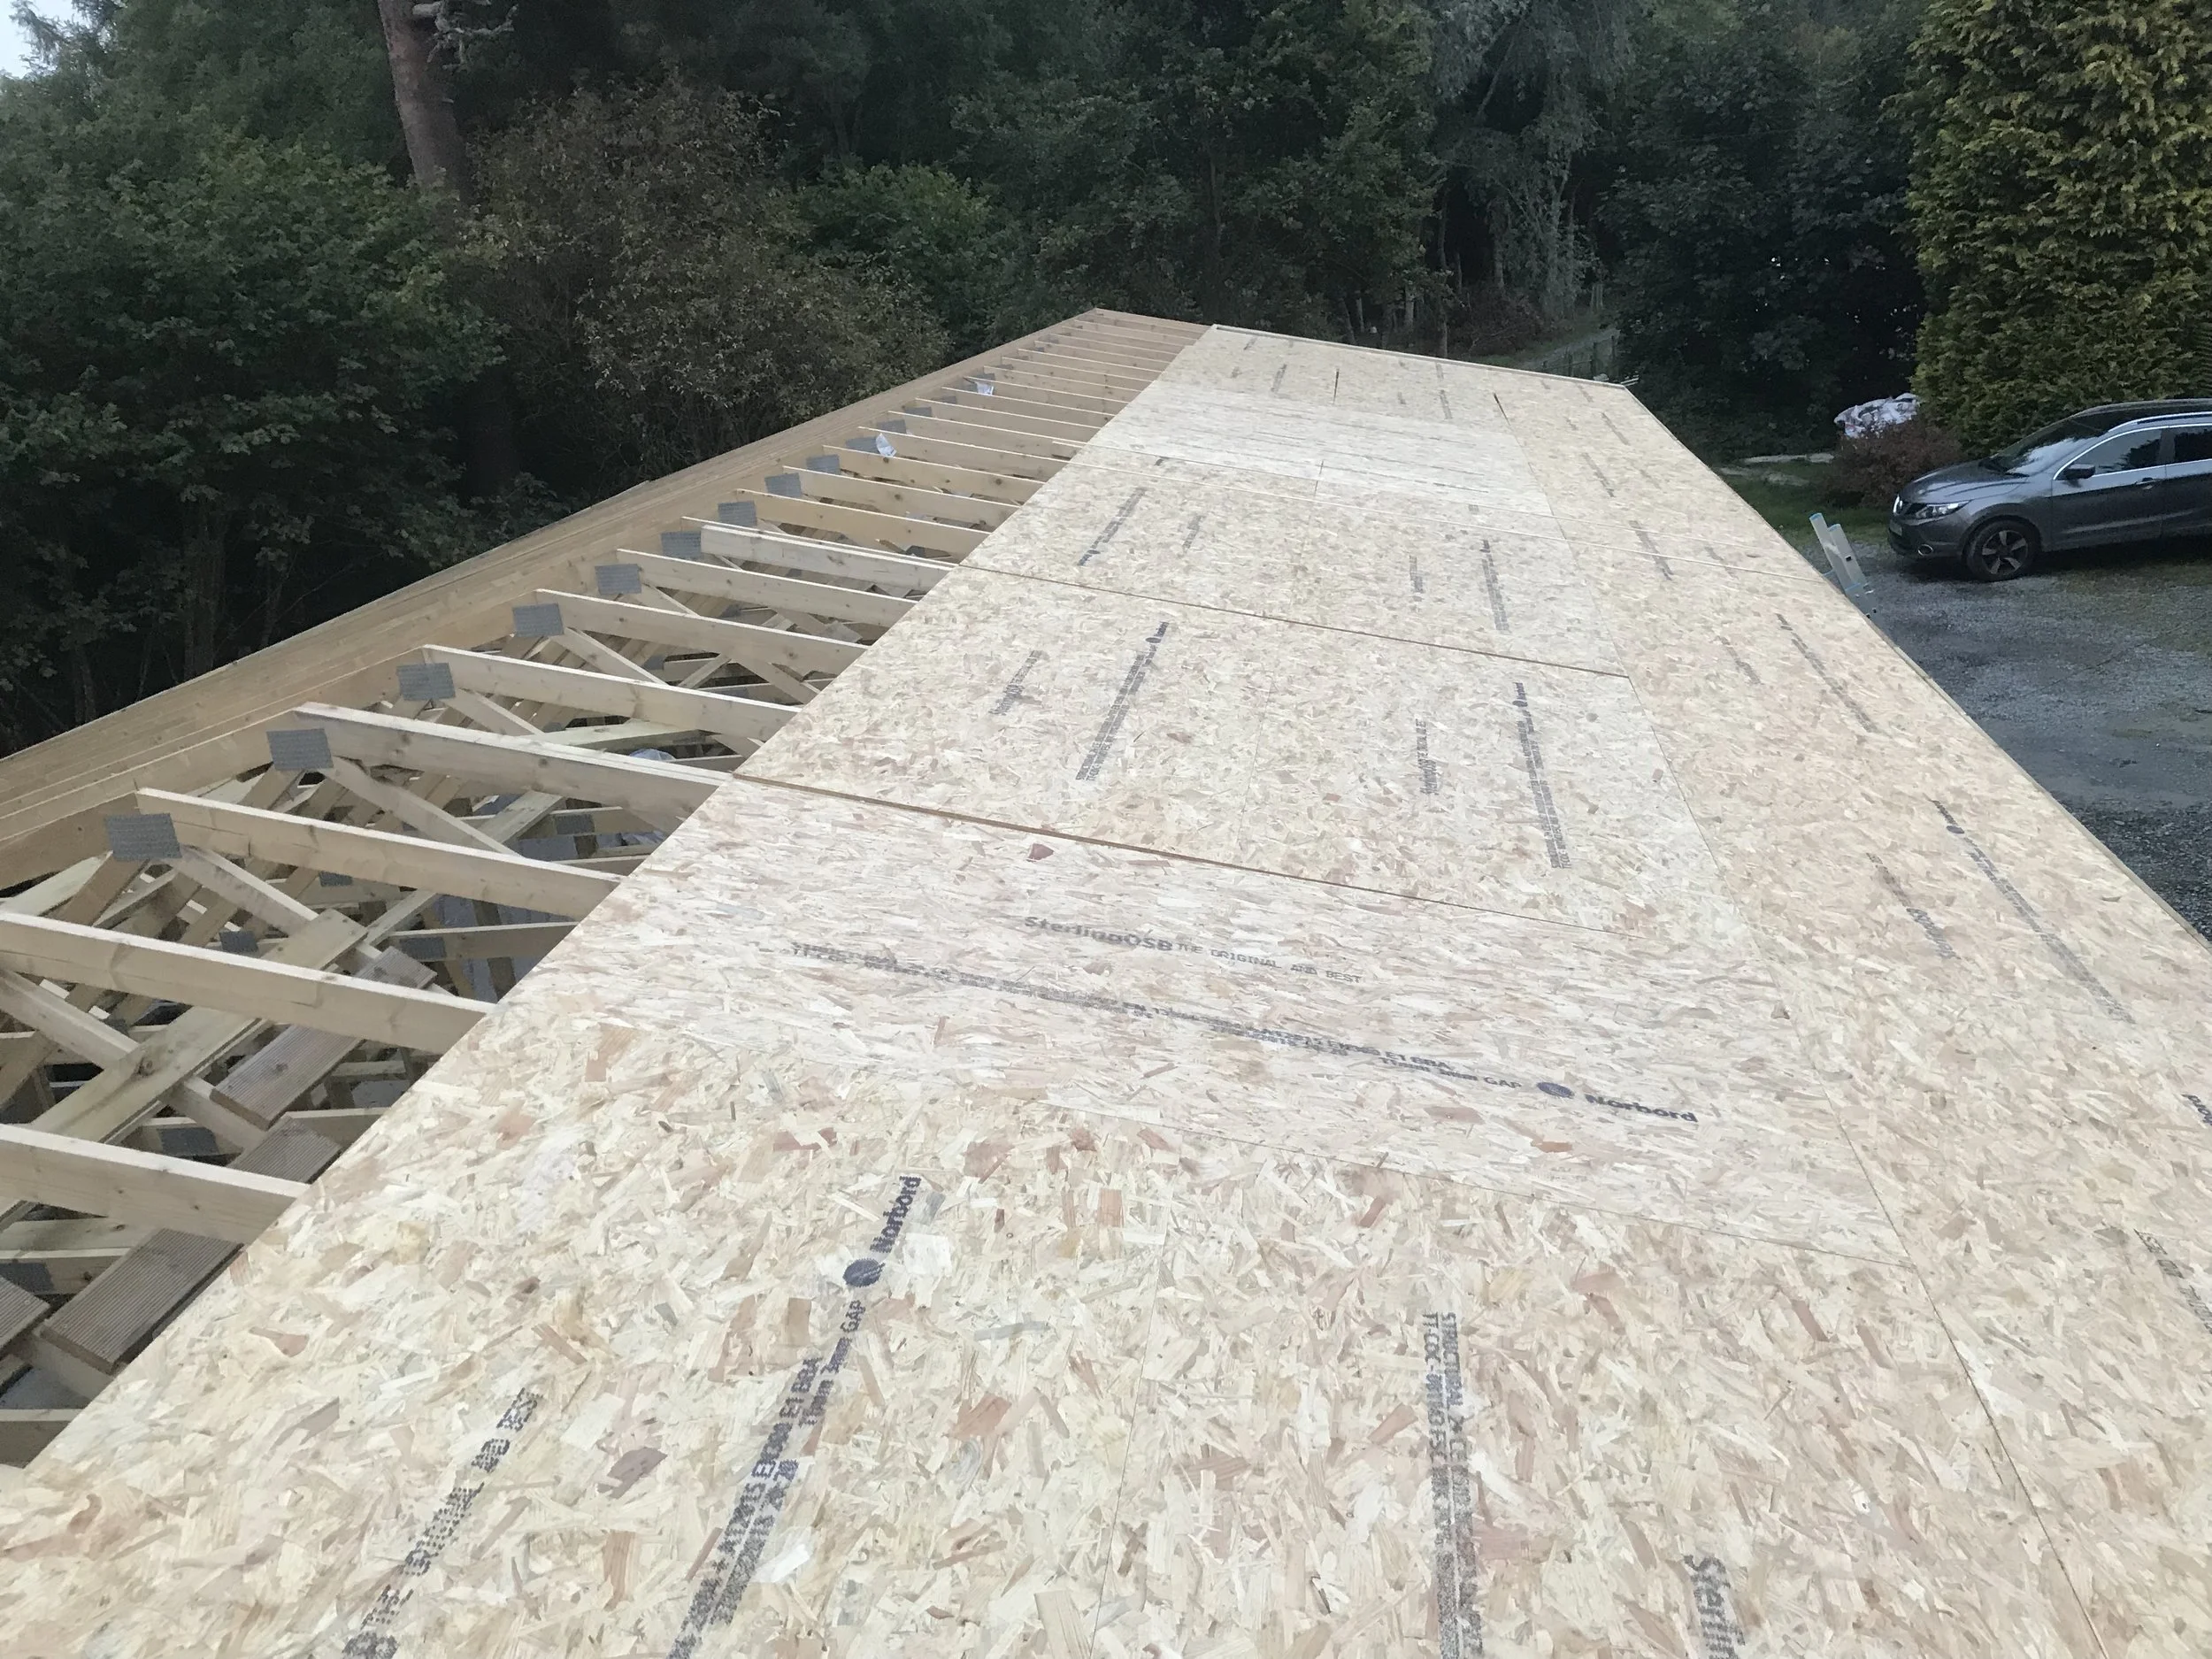
On August 20 I finished the framing, just in time for 30 8m Fink style roof trusses (1.2m rise with a 400mm overhang) to arrive the following day from a local company, Minera Roof Trusses. At this point I thought that I might need some sort of lifting platform and/or crane to install them. However I looked at D70 (my rolling mini-workshop) & decided it could be reincarnated as a platform ladder! This version of D70 became a stalwart of the overall build & was invaluable for almost every stage, but most importantly allowed me to install every truss on my own


Work started on August 25, each truss is only 40kg, but they are just long awkward pieces to lift. I developed a process of lifting from the middle-bottom of each truss, laying one end on top of the stud walls, then balanced the middle section against D70 (upside down) while I lifted the other end on the parallel stud wall. I then pushed the apex upwards to lay horizontally on the platform rails of D70 before walking up the steps to lift the apex into position. I installed both ends first so I could align each truss with a string line, then put temporary bracing in place for each truss as I went along. The toughest trusses were the ones in the middle as the clearance I’d need to swing them upright was an issue - I overcame this by getting the last 3 trusses up together leaning against the others before I positioned them. With the trusses in place I started to install the stability bracing (100mm x 25mm x 3000mm) in line with the plans provided by supplier (who were a pleasure to deal with during the design & delivery process). It was more expensive to buy trusses, but the time saving was well worth the extra money
On 9th September, I moved to sheathing the roof in 11mm OSB, the second major use of my platform ladder D70, but now we needed some new wheels to “off-road” along the front & back of the build. I removed the casters & fitted a couple of steel rods through the base, attaching heavy duty wheel barrow wheels. This made it easier to walk each 8’x4’ sheet onto the roof & nail directly onto the trusses (providing additional stability bracing). Once the sheets were installed I put on Tyvek Housewrap to act as a weather barrier before nailing on 6 rows of 3”x2” purlins on each side of the roof. On the 13th September my roof sheets had been delivered by a local steel fabrication company 10 minutes from our property - J Lloyd & Sons Ltd. I used 0.7mm Polyester Steel 34/100 Box Profile sheets in slate grey (to match the majority of roofing in the North Wales area) in 4.8m lengths. This covered the OSB to an inch short of the apex (to allow air to travel out of the ridge cap) & protruded 2” over the OSB to allow rain water to fall into 4” wide square gutters. I highly recommend this product & recommend the ones with anti-condensation coating on the reverse side. Each sheet has a 1m wide coverage when overlapped & are attached with self-drilling TEK screws & stitching screws (along the overlapping sheets). They say self-drilling, but I found pre-drilling the sheets & then using an impact driver with a hex-head bit was much quicker. When laying roofing sheets, being square is critical from the beginning, so I advise laying a short run of 4 sheets first (well 25% of your overall lengh), then ensure square before carrying on with the remaining run. You should lay your sheets with the overlap pointing away from the prevailing wind. I used 4.8m sheets for speed of installation, but like the timber frames, these are weighty & awkward to lift on your own. I was able to dead-lift from the middle & balance them on my head while walking up the first two steps of D70 to a safe height where I could slide each sheet onto the roof - perhaps not the safest work practice but like everything in building, be confident, but be honest about your capabilities!


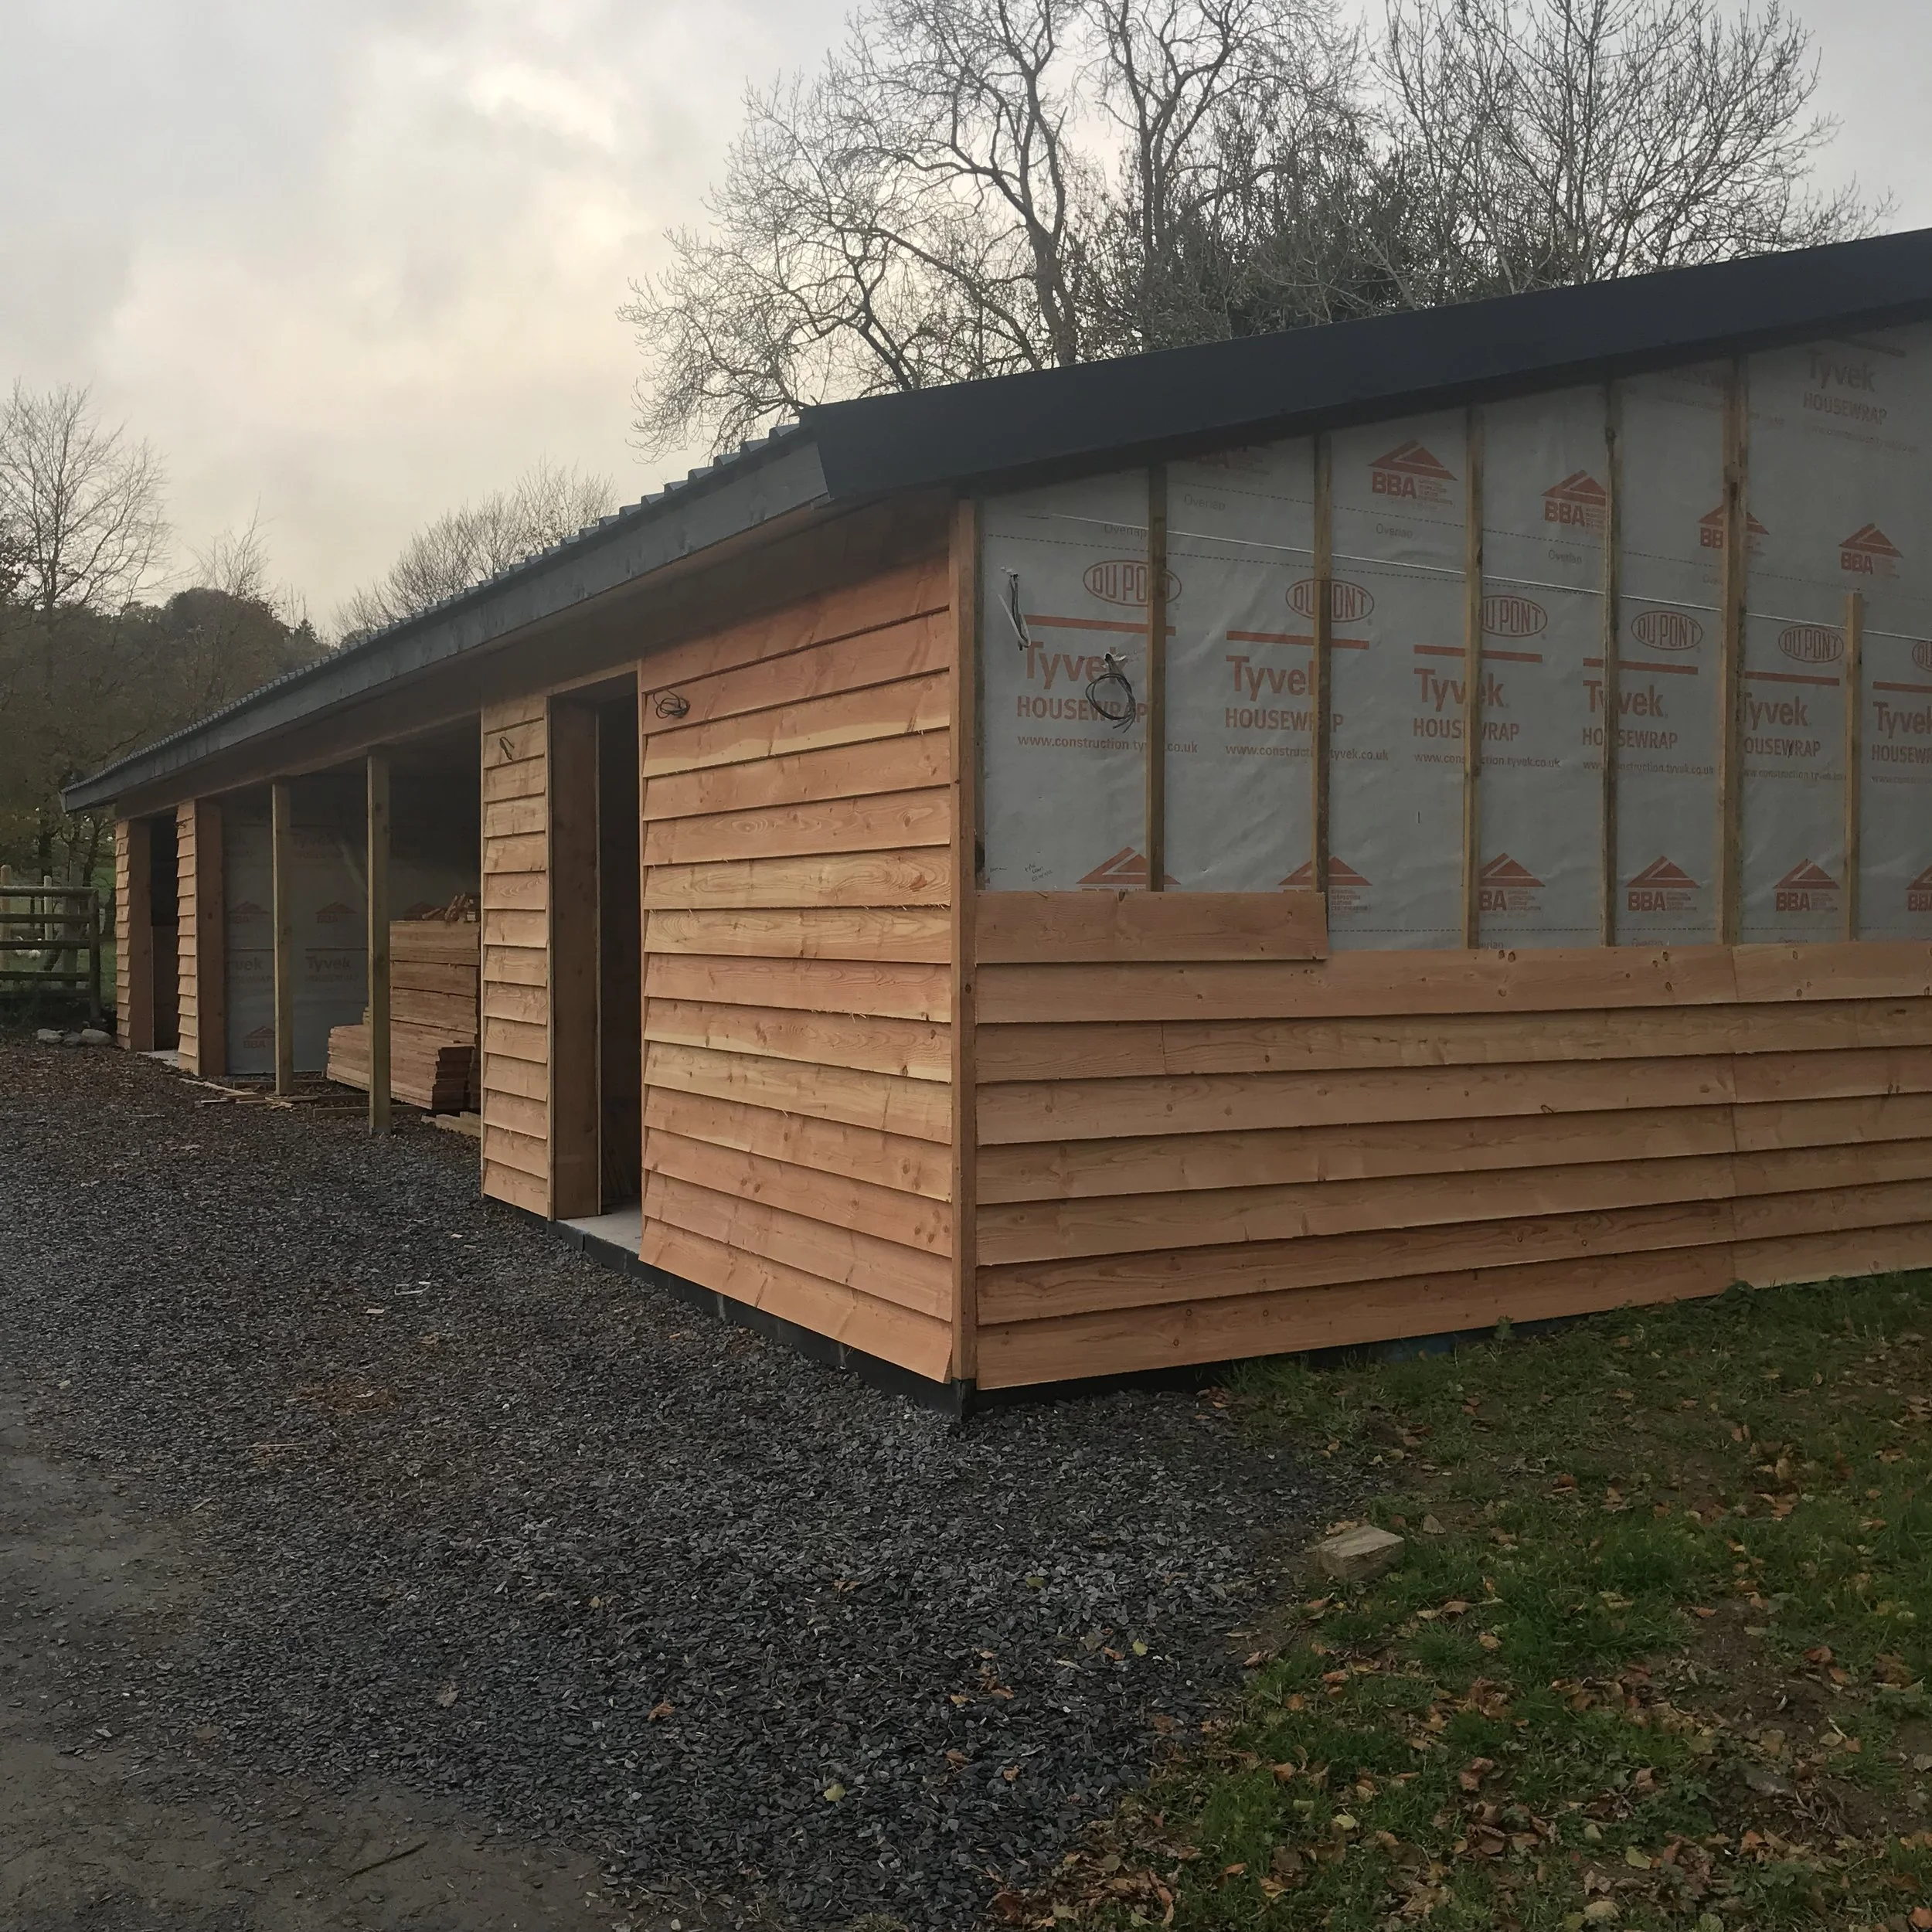
I finished the roof round 15th September & straight away started to sheath the walls with 11mm OSB & housewrap, exactly as I did with the roof. I decided to stack the boards horizontally, once again overlapping the joints between framing sections. If at any stage of your build you’ve felt there was a bit too much movement in your framing, this is the part of the build that will reinforce everything across the frame! After completing OSB around the 23rd September it took a day (or two maybe) to complete the housewrap. It was at this point I took a break from the build as I awaited the insulation & the cladding. I ordered 1,100 linear metre of British Larch rough sawn feather-edge cladding from a local timber merchant called Timber Direct Ltd near Wrexham - this is a family run business with great customer service. The timber was cut locally in North Wales from sustainable woodland. I choose Larch has its moderately durable, and installing it in autumn would allow for two seasons to acclimate to it’s environment, before drying out in summer were shrinkage is a higher risk - that said Larch is pretty good with shrinkage, although it’s not in the same league as Cedar or Douglas fir, howveer, both of those are significantly more expensive than Larch! British Larch has more colour tone (a lot of pink & orange hue before weathering) & wider grain pattern compared to its slower growing Siberian equivalent, which if sourced appropriately is up there with Douglas fir. The lead time on my order was approx. 6 weeks which is pretty standard so plan ahead in your project plan. I knew I had other jobs to crack on with after a couple of weeks downtime.


I restarted around the 13th October with the insulation & used a glass mineral wool product manufactured by Knuaf from my local builders merchants Richard Williams Ltd who provided the majority of the timber & sheeting for this build - I choose this insulation as it has great thermal & acoustic ratings for a relatively low cost compared with insulation board like Celotex (which I used in my Cedar Clad office) or Kingspan - this product is primarily for loft insulation as it has perforated sections for 400mm & 600mm studs which was very helpful! The material is lightweight & easy to cut with a utility knife so it took less than a day to install throughout the walls. The day after my electricians arrived for 1st fix! This is the only part of the build I didn’t do, but I highly recommend that even if you have a good knowledge of wiring, this is a job for professionals! I had 16 double 13a sockets, 9 16a switched sockets (for larger machines like table saws), 12 LED 6ft strip lights (8,000 lumens each), plus 10 outdoor lights with PIR sensors & overrides. The fuse-board is more complex than my house! After the guys finished 1st fix a couple of days later, I got to installing 11mm OSB as interior walls for the workshop (I used a lot of OSB on this build but I get a great discount from my builders merchants!). Using it means that I can attach things to any part of the wall (although for heavier items I know where the studs are too!) as opposed to plasterboard. I like the bare look of OSB, but it paints over fine if you want to go that way…took me about a week on & off before the cladding arrived on 27th October
I started around the garage door as that involved the most cutting on the chop saw. My method for feather-edge boards is to have at least 1/4 of the boards overlapping. For the 8” boards I ordered that would equate to a 2” overlap. With that in mind I cut a 2” strip away from an offcut board & screwed to the 6” piece at a right angle - this creates a lip that butts up to bottom of the last board installed, giving you a rest & a reference point to install the next board. Of course check your levels as you install each board, and I used a laser level particularly around openings so boards aligned either side of doors & windows - this tends to work best in poor light which worked out well as I was doing a lot of this work in the evenings & the light was fading quick as we entered November! I attached the Larch boards onto treated roofing battens installed vertically & screwed into the studs through the OSB, so they were at 600mm centres. At the corners of the building I installed 50mmx50mm larch pieces so the feather-edge ends were not visible. For the openings I installed 250mm larch boards to the inside which protruded by 30mm past the roofing battens to again hide the feather-edge board ends - everything looks nice & clean this way. The gable ends are always the hardest part as you approach the roof-line & soffits - for my method check out my Cladding Tips video on YouTube (coming soon!)
I completed the cladding on 17th November, and by this stage you pretty much have a building! It was the last bits of detail & 2nd fix electrics to finish the job. The lads from DE Jones Electrical returned a few days later to install the fuse-board, sockets & lights (internal & external) while I did the guttering. Actually the first job I did was create some flat surfaces on the feather-edge boards to install the outdoor lights, switches & sockets against. Using scrap boards, I cut them to the width of the fitting, then cut off 2” (or whatever your overlap is) then flipped them over with the thicker part facing upwards - it creates flat surface on the installed board. Back to the guttering…I screwed the gutter boards to the end of the trusses (3m lengths) & then painted them in the same slate grey colour as the roof sheets (its actually a Cuprinol outdoor paint called Silver Copse) I used black square guttering & down-pipes. When that was done I installed some 5mm ply as a soffit underneath the truss overhangs, drilling 22mm holes at 600m intervals (between each truss really) to allow airflow to travel into the roof. On 25th November I officially called the building a wrap & Deer River Workshop was open for business...of course there are doors to build but that’s for another blog post ;-)
Overall the build has cost £26,500 in materials & labour (not including mine!). This price includes the materials for the doors (which at time of writing I had 2 out 5 done) & does include one aluminum framed window which is on back order. That build cost works out to £184 per sqm or £17 sqft - that’s pretty good!